- Published on
Validating environment variables in Nest.js
- Authors
Introduction
It's paramount to ensure the reliability and security of our code. One often overlooked aspect is the proper validation of environment variables. These seemingly little pieces of information play a crucial role in configuring and adapting your applications to various deployment environments.
Environment variables serve as a bridge between your code and the underlying infrastructure, influencing how your application behaves across different environments, such as development, testing, staging, and production. Neglecting to validate these variables can lead to a host of issues, ranging from simple configuration errors to critical security vulnerabilities, ultimately jeopardizing the functionality and integrity of your applications.
For example, you need to connect your application to different databases, for development to your local database, and production to a cloud database with all the production data. You can steer this connection based on individual environment variables like the database host, port, user, password, and much more. As you can guess, this is a critical part of the application where a missing environment variable or a wrong type can cause havoc because your application can't connect correctly to the database.
How cool would it be to validate the environment variables first and then log the result of the failed validation, so that you can see what was wrong immediately without hours of debugging while your application is useless?
That's why I've written this blog post, where we will delve into the reasons why validating environment variables is not just a best practice but a necessity in the realm of software development. Whether you're a seasoned developer or a newcomer to the field, understanding the significance of proper environment variable validation will empower you to build more robust, secure, and resilient applications.
To take this step further, we will see how we can do this in Nest.js and take a look at two common ways to accomplish that.
Validation techniques
A very common use case for environment variables is connecting an API to a database. So, we're going to spin up a Nest.js application and a MySQL database and connect it via environment variables.
Let's start with generating a new Nest.js application:
nest new env-validation
Setup
Now, create a new Dockerfile in the root of the project and add this code:
FROM node:alpine as development
WORKDIR /usr/src/app
COPY package.json ./
COPY package-lock.json ./
COPY tsconfig.json tsconfig.json
COPY nest-cli.json nest-cli.json
RUN npm install -g pnpm
COPY ./ ./
RUN pnpm install -r
RUN pnpm run build
FROM node:alpine as production
ARG NODE_ENV=production
ENV NODE_ENV=${NODE_ENV}
WORKDIR /usr/src/app
COPY package.json ./
COPY package-lock.json ./
RUN npm install -g pnpm
RUN pnpm install --prod
COPY /usr/src/app/dist ./dist
CMD ["node", "dist/main.js"]
If you have got some experience with Docker, you see that this is nothing fancy, but just a pretty straightforward multi-stage Docker file.
We can orchestrate our containers now inside a new docker-compose.yaml in the project root:
services:
	mysql:
		image: mysql
		env_file:
			- .env
		ports:
			- '3306:3306'

	api:
		build:
			context: .
			dockerfile: ./Dockerfile
			target: development
		command: npm run start:dev
		ports:
			- '3000:3000'
		env_file:
			- ./.env
		volumes:
			- .:/usr/src/app
		depends_on:
			- mysql
Great! I have decided to use typeorm as our ORM in this tutorial. To use our environment variables in the Nest.js way, we need to add the dependency for our ConfigService. Let's install a few dependencies :
npm i @nestjs/typeorm typeorm mysql2 @nestjs/config
We can configure the TypeOrmModule in our app.module.ts:
import { Module } from '@nestjs/common';
import { AppController } from './app.controller';
import { AppService } from './app.service';
import { TypeOrmModule } from '@nestjs/typeorm';
import { ConfigModule, ConfigService } from '@nestjs/config';

@Module({
	imports: [
		ConfigModule.forRoot({
			isGlobal: true,
		}),
		TypeOrmModule.forRootAsync({
			useFactory: (configService: ConfigService) => {
				return {
					type: 'mysql',
					host: configService.get('MYSQL_HOST'),
					port: configService.get('MYSQL_PORT'),
					database: configService.get('MYSQL_DATABASE'),
					username: configService.get('MYSQL_USERNAME'),
					password: configService.get('MYSQL_PASSWORD'),
					synchronize: configService.get('MYSQL_SYNCHRONIZE'),
					autoLoadEntities: true,
				};
			},
			inject: [ConfigService],
		}),
	],
	controllers: [AppController],
	providers: [AppService],
})
export class AppModule {}
As you can see, we have set up our ConfigModule and the TypeOrmModule, where we inject the ConfigService and define the different properties that we need for our database connection. The ConfigService helps us to read environment variables and use them inside our application.
However, when we now run:
docker compose up
we can see that we can't connect to our database, because our .env file is empty.
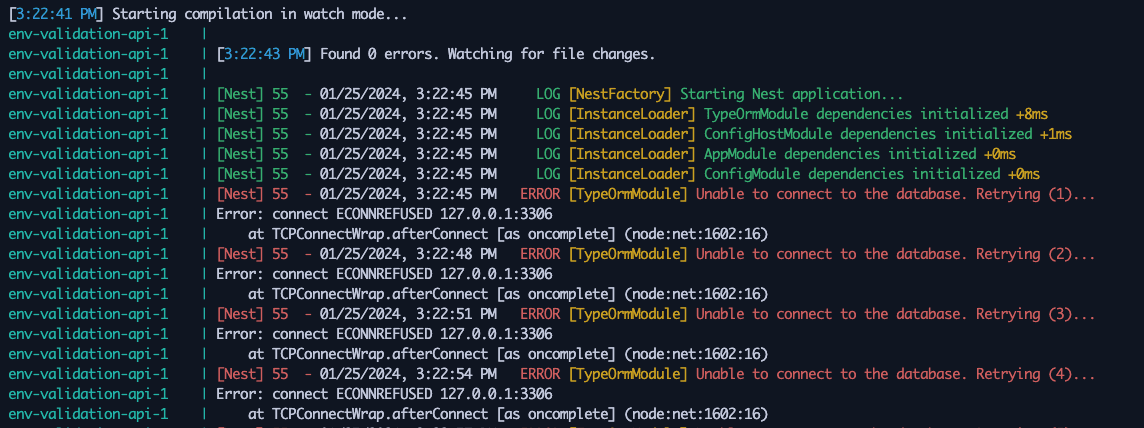
The error message itself is pretty generic. Unable to connect to database doesn't help us pretty much, what exactly went wrong. Of course, we know it happens because our .env file is still empty and we haven't provided database credentials at all. But imagine a scenario where we have many different environment variables or simply don't know what exact variables are needed for this, because normally a .env doesn't get committed to the repository. Of course, you can solve this by adding an env-template.md file for example, but that's not common in every project I have seen.
That's where environment variable validation comes into play! It checks the required environment variables before trying to connect to the database, which is a cleaner way to handle those use cases.
Way 1: Schema Validation with joi
Let's start with making a schema validation using the npm package joi. First, we install the package with npm i joi.
Inside our app.module.ts we're importing it like this:
import * as Joi from 'joi';
On the ConfigModule.forRoot method is a property called validationSchema, which we're leveraging to perform our validation. Add the following code to your existing ConfigModule.forRoot:
ConfigModule.forRoot({
	isGlobal: true,
	validationSchema: Joi.object({
		MYSQL_HOST: Joi.string().required(),
		MYSQL_PORT: Joi.number().required(),
		MYSQL_DATABASE: Joi.string().required(),
		MYSQL_USERNAME: Joi.string().required(),
		MYSQL_PASSWORD: Joi.string().required(),
		MYSQL_SYNCHRONIZE: Joi.boolean().required(),
	}),
}),
// ... other code
As you can see, we have created a new key for every environment variable we need to start up our application properly. After that, we utilized joi to tell the ConfigModule that our environment variables are required and what type we're expecting right here.
When you now start up the development server with:
docker compose up
and still have an empty .env file, you see a more detailed output than before:
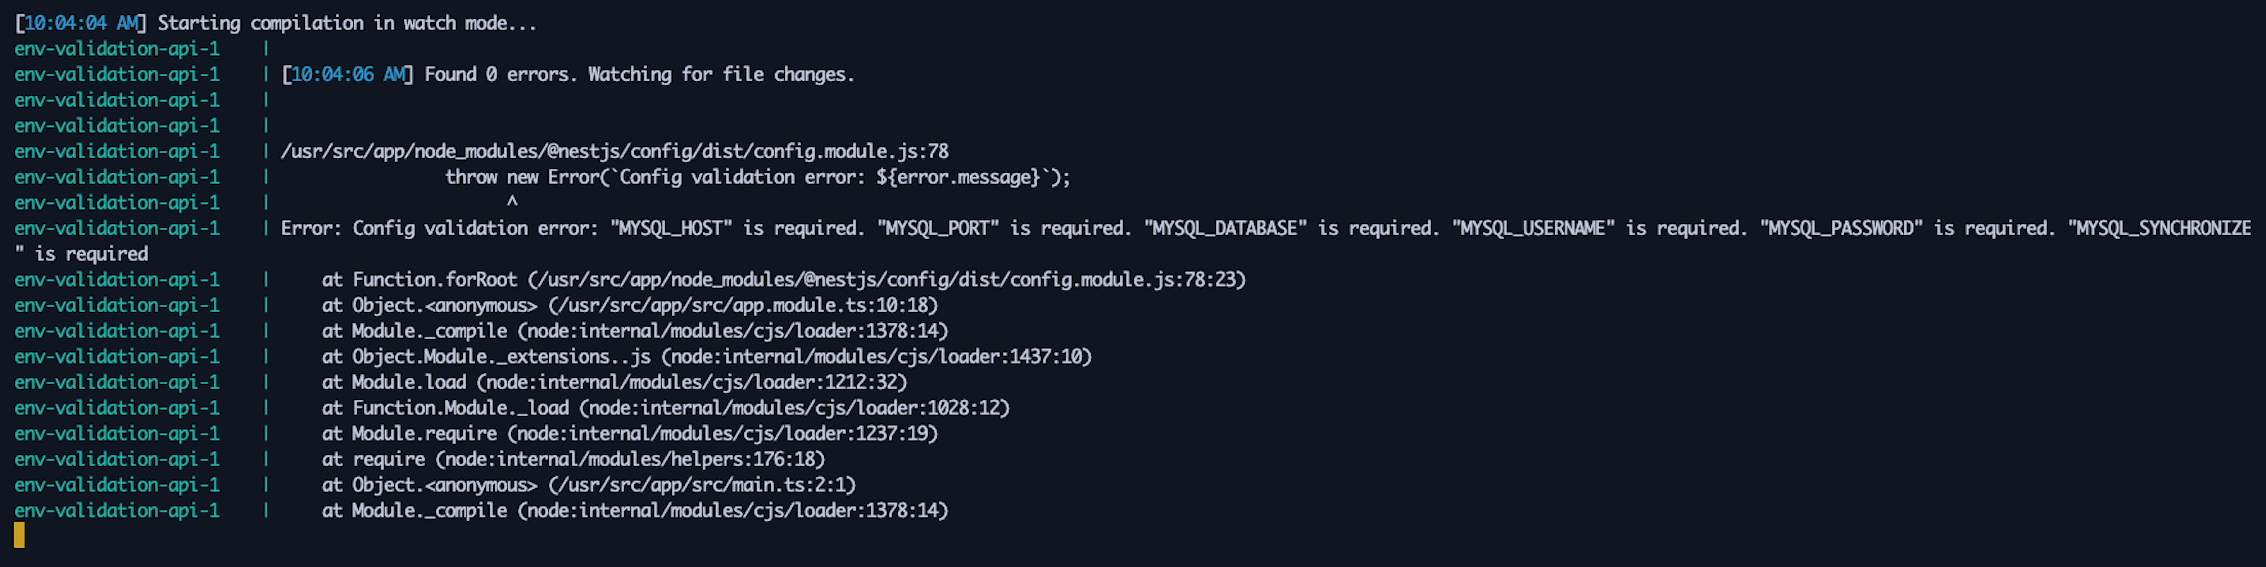
Now we're validating the environment variables first before trying to connect to our database. Let's fill our .env file with the correct values:
MYSQL_HOST=mysql
MYSQL_PORT=3306
MYSQL_DATABASE=database
MYSQL_USERNAME=root
MYSQL_ROOT_PASSWORD=root
MYSQL_PASSWORD=root
MYSQL_SYNCHRONIZE=true
The MYSQL_ROOT_PASSWORD is a required environment variable that our mysql image needs. For more information check https://hub.docker.com/_/mysql.
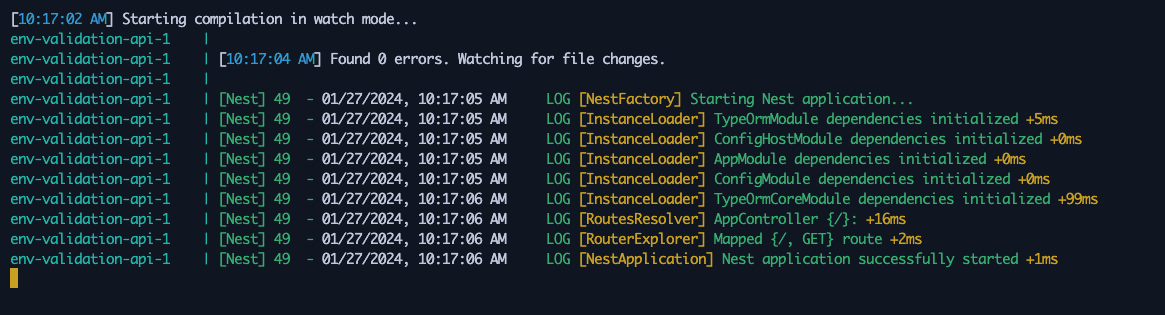
When we now start everything up again with:
docker compose up
our application should start properly without any errors:
Play around a little bit. Insert a wrong value for a variable, provide a wrong type, or misspell a variable name. It's important to get your hands a bit dirty with it on your own to understand what this technique can do and what not.
Way 2: Using the getOrThrow method
Besides schema validation, there is also another very common technique. It's using the getOrThrow method on the ConfigService directly without running our environment variables through a validation schema first.
Let's jump into our main.ts file and get our server port also as an environment variable and use getOrThrow.
import { NestFactory } from '@nestjs/core';
import { AppModule } from './app.module';
import { ConfigService } from '@nestjs/config';

async function bootstrap() {
	const app = await NestFactory.create(AppModule);

	// 👇 Add this code
	const configService = app.get(ConfigService);
	const port = configService.getOrThrow<number>('PORT');

	await app.listen(port);
}

bootstrap();
When we start the containers again, we can see:
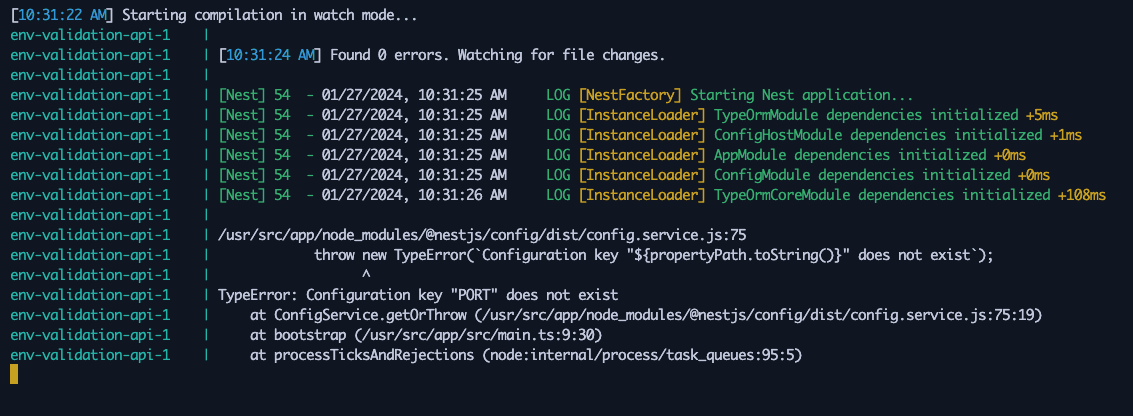
This was something we expected, right? Using the getOrThrow method throws an error when it can't find the provided environment variable. In our case, we haven't provided a PORT environment variable. So the behavior is exactly what we want.
Let's provide a new variable inside our .env:
MYSQL_HOST=mysql
MYSQL_PORT=3306
MYSQL_DATABASE=database
MYSQL_USERNAME=root
MYSQL_ROOT_PASSWORD=root
MYSQL_PASSWORD=root
MYSQL_SYNCHRONIZE=true

PORT=3000
Starting all up again, we don't see any errors and our application starts up properly:
Conclusion
As you can see, validating environment variables in Nest.js is pretty straightforward and important to implement. You have seen two different techniques, that are pretty common and used very often.
The implementation differs a bit, but the result is pretty much the same. You receive a proper validation of the required environment variables before they're used inside your application. However, there is a slight difference between the schema validation and the getOrThrow approach.
With the help of schema validation, you can also specify what data type you're expecting, while using getOrThrow just checking if the environment variable is provided or not. This is a bit more powerful in my opinion. You are also more flexible in configuring required and optional environment variables. Using joi you can also perform a more detailed validation. For example, you can specify how many characters a string at least should have or between which numbers a port variable should be. Check out the docs to get more information about that!
But at the end of the day, it comes to project specifications and a personal taste of what exact way to use here. There are of course some other ways out there. But having no proper validation of your environment variables is no option at all!
I hope you had as much fun as me writing this blog post right here! I wish you much fun with the other posts right here and love to receive any feedback.
Cheers,
Jean-Marc